Application Help sections:
Guide for a quick start.
For pre-made dronesets, go to the tonecircledrone tab.
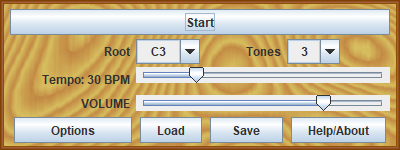
MAIN PANEL
Start/Stop (Button)
Click to start or stop the drone. Start always begins from the 12:00 position. Once started, the button becomes a Stop button. Stop immediately halts loop progress, but also gives tones that are already playing a chance to finish, within a 2-second limit, before cutting their volume.
Root (Select Box)
All notes on the dial are determined relative to the root. Changing the root note transposes the entire drone sequence. A root tone can be in any position on the dial or may even not appear at all in the drone sequence. The range of permitted root notes is limited to values that allow the entire drone pattern to be played with pitches from A0 to C8, with C4 being middle C.
Tones (Select Box)
Sets the number of tones in the drone sequence. Tone Circle Drone can have a single pitch (a common drone-training practice) or as many as 12 tones played in sequence.
Tempo (Slider)
Controls the pace of the drone, in beats per minute (BPM). Each tone on the dial (playing or not) is considered to mark a single beat. Left is slower, right is faster.
Volume (Slider)
Controls the application volume. Left is quieter, right is louder.
Options (Button)
Opens the Options panel.
Load (Button)
Loads drone patterns from a file location.
Save (Button)
Saves drone patterns to a file in XML format.
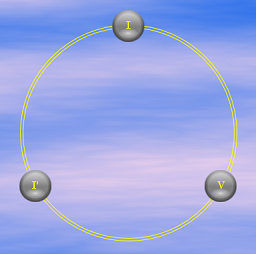
CIRCLE FACE
Single-click on a tone on the dial face to open the Note Settings Panel in the center of the circle. More than one tone can be open for editing at a time. A tone that is being edited will display a yellow bar connecting it to the Note Settings Panel. A single-click on a tone that is being edited in the Note Settings Panel will remove the yellow connecting bar and remove it from being edited.
Double-clicking on a tone on the dial face will have one of two actions. If the Note Settings Panel is open, that tone will be selected for exclusive editing. In other words, if more than one tone is being edited when you double-click, all the other tones will be dropped from editing. If the Note Settings Panel is not showing, the On/Off status of the Note will be flipped. This makes it easy to turn individual notes to either play or be skipped.
All tones can be opened for editing at once by clicking between the two circles that form the dial. All tones can be released by clicking the Dial Panel's background area (avoiding notes, the double-circle band and the Note Settings Panel itself).
Hovering over a note/node will bring up a tool-tip display that will show that note's settings.
Settings for a tone can be copied to another tone within the application by click-and-dragging from the source to the destination tone. It is also possible to load a tone into the clipboard by positioning the mouse over the node and using the standard Copy keystroke combination of the Control Key + C. If a tone has been saved to the clipboard, you can paste it into a node by positioning the mouse over that node and hitting the standard Paste keystroke combination of Control Key + V. This technique can be used both for copying within a single application and for copying to additional copies that are running, allowing drone tones to be copy sources for building new drone sets.
Undo/Redo (keystroke combination)
The ctrl+z key combination will progressively Undo any edits made in the Note Settings Panel. The ctrl+y key combo will progressively Redo any edits that were undone.
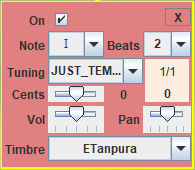
NOTE SETTINGS PANEL
ON (Check Box)
Check to allow the tone to be played. If the On checkbox is not checked, the tone will be skipped, and the tone graphic will be a small, unlabeled, grey globe. Tones which are skipped continue to function as place holders for timing. If more than one tone is being edited, and some are playing and other are set to be skipped, the checkbox will be marked with a ?. Clicking it will set all the tones in the editing area to ON.
Note (Select Box)
Select a pitch to be played. The pitch selections are relative to the root note of the Main Panel. Choices range from one octave below to two octaves above the root, as long as the pitch is within the range allowed: C0 to A6, the lowest and highest keys on a grand piano. The nomenclature is set in the Options Panel. Pitches in the select box are arranged from lowest to highest. An ' (apostrophe) before the note name is used to indicate a lower octave, and an ' after the note name is used to indicated a higher octave. Example: 'Do is an octave below the root, and Re' is an octave and major second above the root.
Beats (Select Box)
Select how many beats a tone or tones will play before being released. Each position on the cycle face is one beat. Tones are allowed to remain on for up to one full cycle. When a tone is stopped, its decay envelope will allow some of the sound to bleed over into the following beat.
Tuning (Select Box)
Select a temperament or tuning system for the tone(s). You can find more information about the specific temperament choices in the Options section below. To the right of the select box, a label displays a ratio, formula, or hard-coded number of cents used to derive the pitch relative to the root's pitch. Just below, in a second row of this label, is displayed the number of cents that the above tuning calculation deviates from equal temperament. All computations are calculated to the nearest cent. The tuning for a newly created note will be the Default Tuning selected in the Options Panel.
Cents (Slider)
Set to fine-tune the tone or tones, especially for when the desired pitch does not match one provided by a tuning system. A cent is 1/100th of an equal-tempered semitone. The value in this field is combined with the cents offset arising from the temperament calculation. The range of this slider is from -50 (flattest, to the left) to 50 (sharpest, to the right).
Volume (Slider)
Set the volume of the tone(s). Using this control, notes in the cycle can be made louder or softer than one another. Left for quieter, right for louder.
Pan (Slider)
Set the stereo location ("pan") of the tone(s). Each tone can have its own stereo location. Move the slider left for stereo left and right for stereo right.
Timbre (Select Box)
Select the timbre of the tone(s). Each entry corresponds to a different synthesized sound generator.
| Name | Start | Envelope | Chorused? |
|---|---|---|---|
| ETanpura | fade-in | evolves | yes |
| PureSine | fade-in | steady | no |
| Steady Sawtooth | fade-in | steady | no |
| Sweep Sawtooth | fade-in | evolves | no |
| SquareWave | fade-in | evolves | no |
| Organ | attack | steady | no |
| Harp | attack | decay to silence | yes |
| EPiano | attack | decay to silence | yes |
| Vibraphone | attack | decay to silence | yes |
| StringSynth | fade-in | steady | yes |
| Cirrus | fade-in | steady | yes |
| BrassGas | fade-in | evolves | yes |
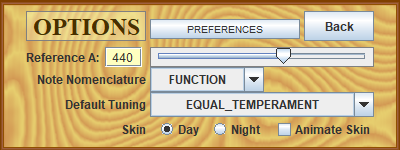
OPTIONS PANEL
Press the Options button on the Main Panel to bring up this menu of settings.
Reference A (Text Field + Slider)
Enter a value to specify the frequency in Hertz of A4. The value can either be typed in, or set via the slider. In the USA, A4 is commonly set to 440 Hz. In Europe and other continents, A4 may be set a few cents higher. For Period Music practice, an A4 of 415 Hz is often used for the Baroque era or prior, and 432 Hz for the Classical era, but different standards were also in use. The permitted range for this field is from 380 Hz to 480 Hz. Changes to this value will not affect the pitch of tones that are already playing, only tones that are played after the change has been made.
Nomenclature (Select Box)
Select a nomenclature to be used to designate the names used on the tone circle labels.
- Absolute will give the tone a name using scientific pitch notation. For flatted notes, the enharmonic sharp equivalent is used.
- Function uses Roman numerals to correspond to the different scale degrees. Upper case is used for Major (e.g., III) and lower case is used for Minor (e.g., iii). For the augmented 4th, we use the "+IV".
- Interval uses a system of intervalic designations commonly seen in Jazz chord notation. Intervals in the second octave use the compound number (first octave + 8) as is usually seen with Jazz chords. Intervals below the root (this may be a questionable design decision) are shown with a preceding "-" to designate a dropping interval. For example, "-M3" is a major 3rd below the root.
- Sargam uses Indian syllables for the scale degrees. The immovable notes (Sa, Pa) are capitalized. Where there are two versions of a note, e.g., a komal or tivra note, the unaltered version will be capitalized, and the altered version will be written in lower case (e.g., in pitch ascending order: re, Re, ga, Ga, Ma, ma). An apostrophe (') before the name indicates an octave lower. Each apostrophe after the name indicates a higher octave.
- Semitone indicates the number of semitones relative to the root. There are 12 semitones to an octave. The lowest octave ranges from -12 to -1, the root and top octaves range from 0 to 24.
- Solfege uses a subset of the Moveable Do European solfege notation. An apostrophe (') before the name indicates an octave lower. Each apostrophe after the name indicates a higher octave.
Intonation System (Select Box)
This control selects the default intonation system.
- Equal Temperament divides the octave into equal units. With this system, there are no perfect ratio intervals except for the octave itself. All intervals are a multiple of 2^1/12, the ratio of a semitone.
- First Matching Harmonic gives the interval a pitch that best matches a harmonic of the root, corrected for the octave. For example, consider the major third of C which is E natural. The first overtone series note is the 5th harmonic of C3, or 5:1, which comes to 5:4 after correcting for the octave. This E3 is -14 cents relative to the equal-tempered major third. All calculation are relative to the current root pitch.
- Pythagorean This tuning preserves the 3:2 ratio (702 cents) for all fifths except G#-Eb, which is 24 cents short of an equal-tempered fifth (aka Pythagorean Comma = 676 cents). All calculations originate from the note of C.
- Just Temperament divides the octave via a system of low interval ratios. The system is associated with Ptolemy, and some early Renaissance theorists. While Just temperament has been used with the calculations all originating from C, in this implementation calculations originate in the current root pitch.
- Werckmeister III Temperament is a well tempered tuning system. The scale is generated by cycling through the cycle of fifths, using fifths that are either perfect ratios (3:2, 702 cents, for A-E, E-B, F#-C#, C#-G#, G#-Eb, Eb-Bb, Bb-F. F-C) or ratios tempered by 1/4th of a Pythagorean comma (24/4 = 6, giving fifths of 696 cents for intervals C-G, G-D, D-A, B-F#). All calculations originate from the note of C.
- Vallotti Temperament is a well tempered tuning system. The scale is generated by cycling through the cycle of fifths, using fifths that are either perfect ratios (3:2, 702 cents, for B-F#, F#-C#, C#-G#, G#-Eb, Eb-Bb, Bb-F) or ratios tempered by 1/6th of a Pythagorean comma (24/6 = 4 cents, giving fifths of 698 cents for intervals C-G, G-D, D-A, A-E, E-B, F-C). Calculations are all based on the originating note of A.
- Neidhardt Temperament is a well tempered tuning system with fifths either being perfect, or being altered from perfect by either 1/4 or 1/6 of the Pythagorean comma. All calculations are based on the originating note of C.
- Shruti Low is the lowest in pitch of five possible perfect-ratio based intervals given for each scale degree in Indian classical music. The Sa (1st degree) and the Pa (5th degree) will almost always be better served with the Shruti Mid choice. All calculations based on the current root.
- Shruti ML (medium low) is the second lowest in pitch of five possible perfect-ratio based intervals given for each scale degree in Indian classical music. The Sa (1st degree) and the Pa (5th degree) will almost always be better served with the Shruti Mid choice. All calculations based on the current root.
- Shruti Mid (middle) is the middle in pitch of five possible perfect-ratio based intervals given for each scale degree in Indian classical music. The Sa (1st degree) and the Pa (5th degree) will almost always be best served with this choice. All calculations based on the current root.
- Shruti MH (medium high) is the second highest in pitch of five possible perfect-ratio based intervals given for each scale degree in Indian classical music. The Sa (1st degree) and the Pa (5th degree) will almost always be better served with the Shruti Mid choice. All calculations based on the current root.
- Shruti High is the highest in pitch of five possible perfect-ratio based intervals given for each scale degree in Indian classical music. The Sa (1st degree) and the Pa (5th degree) will almost always be There are served with the Shruti Mid choice. All calculations based on the current root.
Skin (Radio Buttons, Check Box)
This control selects the background graphic. The two choices available are a Day and a Night sky background. These backgrounds can be animated by checking the Animate check box on the far right.
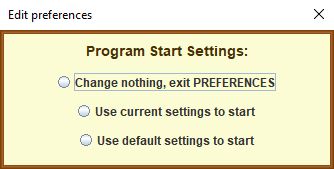
PREFERENCES PANEL
The Preferences Panel is used to set the tempo and volume level for the application when it is first opened. The panel offers three choices:
- The first choice: Change nothing, exit PREFERENCES is self explanatory.
- The second choice: Use current settings to start will read and remember the current tempo and volume settings, and will use them the next time the application is opened.
- The third choice: Use default settings to start will set the initial tempo to 30 BPM and the initial volume level to 75% for the next time the application is opened.